How to create a responsive Facebook banner for your non-profit
Laura Joe - de Bruine
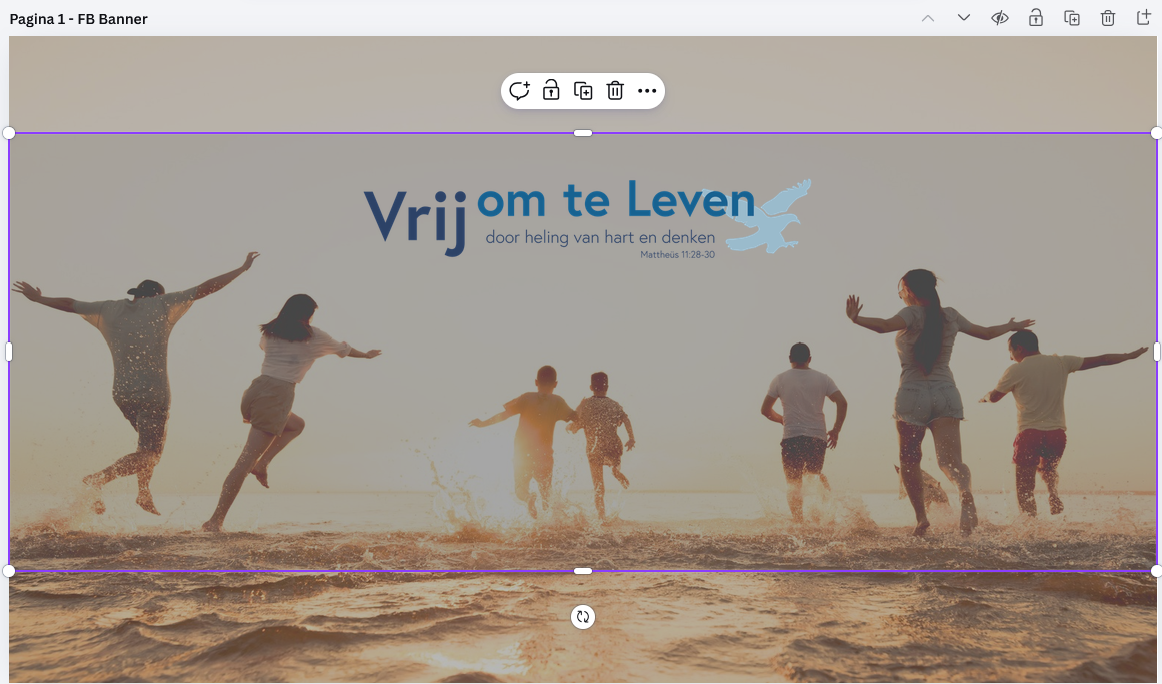
A Facebook banner is often one of the first things visitors to your non-profit see. It's therefore important that the banner looks professional and immediately makes clear what your organisation stands for. Yet things regularly go wrong. On a computer the banner looks fine, but on a mobile phone text, faces or other important elements fall outside the visible area. That creates a poor first impression. This happens because Facebook displays the cover photo differently on a computer than on a smartphone. Fortunately, you can take this into account while designing. In this blog I, Laura Joe – de Bruine, explain step by step how to create a Facebook banner in Canva that looks professional on both computer and mobile. As I was able to do, for example, for Vrij om te Leven, a foundation that offers Christian support for living in freedom.
Why does a Facebook banner look different on mobile?
Facebook adapts the crop of your cover photo to the visitor's screen. On a computer, mainly the wide middle section of the image is shown. On a mobile phone you see more of the full image, including a larger part at the top and bottom. You therefore don't need to create separate banners for mobile and computer. You can use one design, as long as you place the most important elements within a safe zone.
Step 1: create a design of 1200 by 675 pixels
Open Canva and click Create a design. Then choose Custom size. Use the following dimensions:
Width: 1200 pixels
Height: 675 pixels
This full design is the basis for the mobile view. On a mobile phone you see almost the entire image.
Step 2: create a bar 457 pixels high
Next, make visible which part of the banner remains in view on a computer.
Add a rectangle in Canva with the following dimensions:
Width: 1200 pixels
Height: 457 pixels
Place this rectangle exactly in the middle of the design.
The full design is 675 pixels high. If you centre the 457-pixel bar, about 109 pixels remain at the top and bottom.
Temporarily make the rectangle a bright colour. You can also make it partially transparent, so you can still see the background photo.
You only use the rectangle as a guide while designing and remove it before downloading the Facebook banner. See the photo at the top of this blog for an illustration.
Step 3: place important information within the bar
The middle area of 457 pixels high is the part visible on a computer. So place all important information within this bar, such as:
- The name of your non-profit
- A slogan or short message
- An important date
- A call to donate
- A web address
- People's faces
- Important parts of a photo
The background photo may run across the full 1200 by 675 pixel design. Just make sure the photo still looks good when only the middle section is shown on a computer. For example, don't place a face right at the very top or bottom. That face could partially or fully fall out of view on a computer.
Step 4: leave enough room in the bottom-left corner
On the mobile version, your non-profit's profile photo sits over the bottom-left of the Facebook banner. For many non-profits, the profile photo contains the logo. This can cover part of the banner. So don't place important text, faces, dates or other information in the bottom-left of the design. Keep this area calm. That way you avoid the logo covering important information. Also check the contrast. Does your logo have a dark background, for example? Then make sure the part of the banner behind the logo isn't too dark.
Step 5: make the text easy to read
A Facebook banner is often viewed on a small phone screen. So don't use long pieces of text.
Preferably choose:
- One clear heading
- A short supporting sentence
- A clear, readable font
- Enough contrast between text and photo
- No more than two different fonts
Want to share more information? Put that in the post, on the Facebook page or on your non-profit's website.
The banner is mainly meant to grab attention and create recognition.
Step 6: download the banner
In Canva, click Share in the top right, then Download.
Preferably choose PNG. This file format is suitable for designs with photos, text, logos and graphic elements.
Then upload the image as the cover photo on your non-profit's Facebook page.
Step 7: check the banner on computer and mobile
Always view the Facebook page on different devices after uploading.
Check the banner on:
- A desktop or laptop
- A mobile phone
- The Facebook app
- A mobile web browser
Pay close attention to text, faces and the bottom-left area where the profile photo sits.
Is something not clearly visible? Then go back to Canva and move that element further towards the centre of the safe zone.
Summary
This is how you create a Facebook banner that works well on both computer and mobile:
- Create a design of 1200 by 675 pixels in Canva.
- Add a temporary bar of 1200 by 457 pixels.
- Centre this bar vertically.
- Place all important information within this safe zone.
- Leave enough room bottom-left for the profile photo.
- Remove the temporary bar before downloading the design.
- Download the banner as PNG.
- Check the result on a computer and a mobile phone.
With this approach you create one professional Facebook banner that displays well on both screen formats. That way, your non-profit's message always comes across clearly.
A tip I often give to non-profits: request free Canva for Nonprofits
Is your organisation officially registered as a non-profit? Then you may be eligible for Canva for Nonprofits.
Canva officially calls this programme Canva for Nonprofits. Approved organisations get free access to Canva Pro's premium features and various ways to collaborate with a team. One team can consist of up to 50 users.
With this version you can, among other things:
- Save brand colours, fonts and logos
- Create a brand kit for your organisation
- Use premium photos and elements
- Easily resize designs to other formats
- Collaborate with volunteers and team members
- Create folders to keep designs organised
- Remove backgrounds from photos
When applying, you need to be able to show that your organisation is officially registered as a non-profit. Canva may ask for registration documents and documents describing the organisation's structure and social purpose.
This way your non-profit can create professional banners, social media posts, presentations, flyers and annual reports without a paid Canva Pro subscription costing €110 per year.
Could you use help with your social media?
Do you need help creating a professional Facebook banner? Or with a social media, website and/or newsletter strategy? Check out my free webinar with Partin about social media and event fundraising. Did you know we recently started working with Patricia from Uganda? She's incredibly good at what she does, and I love collaborating with African professionals to create double the impact! Want to know more about what we can do for you? Schedule an introductory call here.